Battery switch on travel trailer function is crucial for managing your RV’s power. Understanding how your battery switch works is key to preventing electrical issues and maximizing your off-grid adventures. This guide breaks down the different types of switches, their functions, troubleshooting tips, and safety precautions. We’ll cover everything from basic operation to integrating solar panels and inverters, ensuring you’re confident in handling your travel trailer’s electrical system.
We’ll explore the various types of battery switches – single-pole, double-pole, and double-pole double-throw – detailing their pros and cons. You’ll learn how to troubleshoot common problems, add extra batteries, and safely integrate solar power and inverters. By the end, you’ll be a battery switch pro!
Troubleshooting Common Battery Switch Issues
So, your travel trailer’s battery switch is acting up? Don’t worry, it’s a common problem with a few easily identifiable causes and straightforward solutions. This section will guide you through troubleshooting and preventative maintenance to keep your power system humming.Troubleshooting a malfunctioning battery switch usually involves checking for some common culprits. These include corrosion buildup on the terminals, loose connections that prevent proper electrical flow, and, in some cases, a complete switch failure.
Let’s tackle each of these possibilities systematically.
Identifying Potential Problems
A visual inspection is your first step. Look closely at the battery switch itself and the connections to both the battery and the trailer’s wiring harness. Corrosion appears as a greenish-white or bluish-white powdery substance on the metal terminals. This buildup acts as an insulator, preventing the electricity from flowing properly. Loose connections are equally problematic, as they create intermittent contact or even a complete break in the circuit.
Finally, if the switch itself is damaged or internally broken, it won’t be able to perform its switching function. You might notice physical damage to the switch or simply that it doesn’t respond as expected when you move the lever.
Step-by-Step Troubleshooting
- Safety First: Always disconnect the negative (-) battery cable before beginning any work on the electrical system. This prevents accidental shocks or short circuits.
- Inspect for Corrosion: Carefully examine all connections for corrosion. Use a wire brush or sandpaper to clean any corroded areas until the metal is shiny and clean. Apply a corrosion inhibitor or dielectric grease to the cleaned terminals to prevent future corrosion.
- Check Connections: Ensure all connections are tight. If any are loose, tighten them securely with the appropriate wrench or tools. Pay attention to both the battery terminals and the wiring harness connections to the switch.
- Test the Switch: With the negative cable reconnected, test the switch functionality. Try switching between the different positions (battery, both, off) and observe if the appropriate power flows to the trailer’s systems. Use a multimeter to verify voltage at various points if needed. If the switch still fails to operate correctly, it may need to be replaced.
- Replace the Switch (If Necessary): If you’ve ruled out corrosion and loose connections, the switch itself might be faulty. Replacing the switch is a relatively straightforward process, but consult your trailer’s wiring diagram and owner’s manual for specific instructions. Ensure you get a replacement switch with the correct amperage rating.
Preventative Maintenance
Regular preventative maintenance significantly extends the lifespan of your battery switch. Here’s a list of tasks you should perform periodically:
- Regular Inspection: Visually inspect the switch and connections every few months, especially before and after extended storage.
- Clean Connections: Clean any corrosion or debris from the terminals with a wire brush and apply dielectric grease.
- Tighten Connections: Ensure all connections are tight. Periodically re-tighten them, especially after driving on rough roads.
- Protect from the Elements: If your battery switch is exposed to the elements, consider adding a protective cover to shield it from moisture and debris.
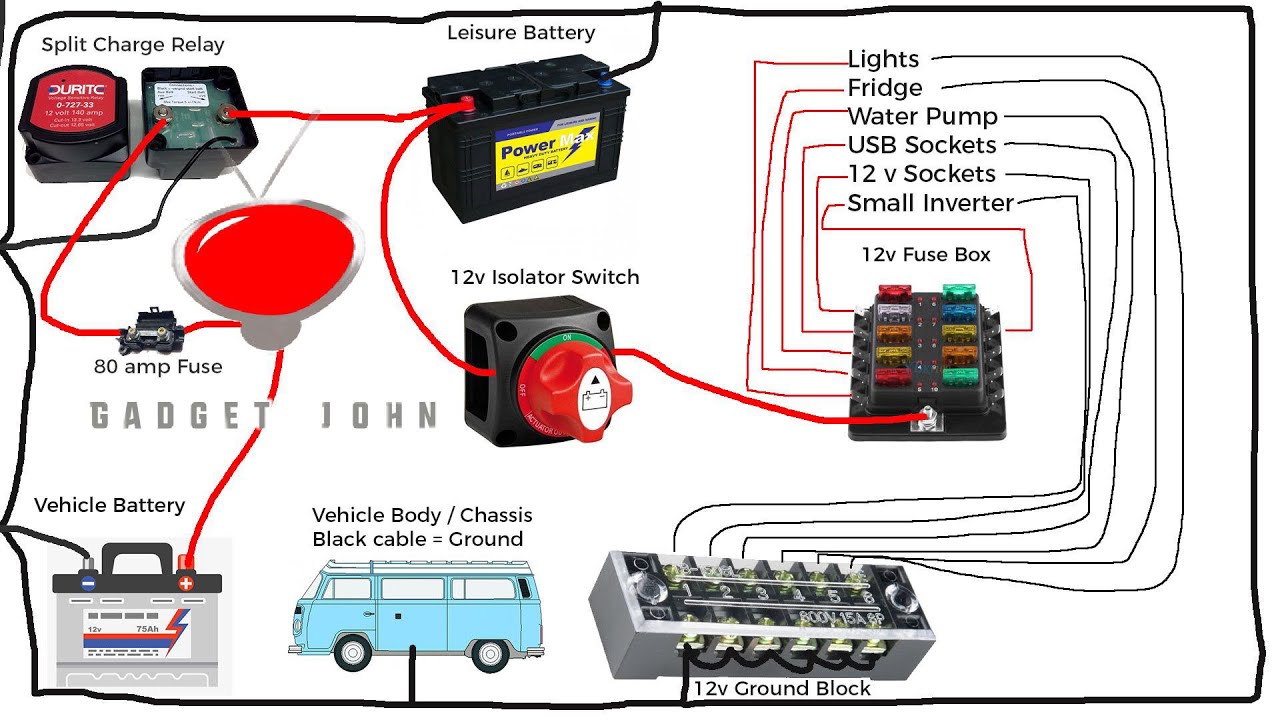
Connecting Additional Batteries: Battery Switch On Travel Trailer Function
Adding more batteries to your travel trailer’s power system can significantly extend your off-grid camping capabilities. This involves carefully integrating the new batteries into your existing setup, ensuring proper wiring and safety. The battery switch plays a crucial role in managing the power flow from these additional batteries.Properly connecting additional batteries increases your power capacity, allowing you to run appliances for longer periods without needing to hook up to shore power.
However, incorrect wiring can lead to serious problems, including damage to your electrical system and even fire hazards. Therefore, it’s crucial to follow these steps meticulously.
Battery Bank Configuration and Switch Selection, Battery switch on travel trailer function
The first step is determining the best configuration for your additional batteries. Common setups include parallel connections (all positive terminals connected together, all negative terminals connected together) which increase amperage, or series connections (positive of one to negative of the next) which increase voltage. The type of connection will determine the wiring requirements and the type of battery switch you need.
A parallel connection, for example, will require a battery switch capable of handling the increased amperage of the combined battery bank. If you’re adding a significant amount of battery capacity, you might need to upgrade your existing battery switch to a higher amperage model. A professional electrician can assess your needs and recommend the appropriate configuration and switch.
Wiring Additional Batteries
Before beginning any wiring, disconnect the negative terminal of your existing battery bank to prevent accidental shorts. Next, securely mount the new batteries, ensuring they’re well-ventilated and protected from damage. Use appropriately sized battery cables, typically heavy-gauge copper wire designed for high amperage applications. Connect the positive terminals of the new batteries to the positive terminals of the existing batteries, or to a bus bar specifically designed for this purpose.
Similarly, connect the negative terminals of the new batteries to the negative terminals of the existing batteries, or to a separate bus bar. Once all connections are made, carefully reconnect the negative terminal of your existing battery bank. Finally, ensure that all connections are clean, tight, and properly insulated to prevent corrosion and shorts. Using anti-corrosion paste on the terminals is highly recommended.
Safety Precautions for Working with Batteries and Electrical Systems
Working with batteries and electrical systems presents several potential hazards. Always wear appropriate safety gear, including safety glasses and gloves. Batteries produce corrosive acid, so take extra precautions to avoid spills. If a spill does occur, neutralize it according to the manufacturer’s instructions. Never work on the electrical system while it’s connected to a power source.
Disconnect the negative terminal first, then the positive. Use insulated tools to prevent shocks. Ensure the area is well-ventilated to prevent the buildup of flammable hydrogen gas, which batteries can produce. If you’re uncomfortable performing any of these steps, consult a qualified electrician. Improper wiring can lead to serious injury or damage.
Testing the Battery Bank
After connecting the additional batteries, test the voltage and amperage of the entire battery bank using a multimeter. This ensures that the batteries are correctly connected and functioning as expected. Check for any voltage drops across connections, which could indicate a loose or corroded connection. If you encounter any issues, disconnect the battery bank immediately and re-check your work.
Battery Switch and Solar Panel Integration

Your battery switch plays a crucial role in how your solar panel system charges your travel trailer’s batteries. Understanding this interaction is key to maximizing your solar power and avoiding potential problems. Essentially, the switch acts as a gatekeeper, determining which battery bank(s) the solar charge controller can access.The battery switch affects the charging process by controlling the flow of electricity from your solar panels.
If the switch is off or in the wrong position, your solar panels may not be able to charge your batteries at all, or they may only charge a portion of your battery bank. This can lead to undercharged batteries and reduced system efficiency. Conversely, a correctly positioned switch ensures your solar controller directs the power to the appropriate batteries, optimizing the charging process.
Solar Panel System Wiring Configurations
Proper wiring is paramount. A typical setup involves the solar panel’s positive and negative leads connecting to the solar charge controller. The controller’s output leads then connect to the battery switch, usually to the “both” or “all” position terminals, allowing charging to both battery banks if applicable. If you only have one battery bank, you would connect the controller to the corresponding terminal on the switch.
Improper wiring can result in blown fuses, damaged equipment, or even fires. Always consult the wiring diagrams for both your solar charge controller and battery switch for precise guidance. If unsure, seek professional assistance.
Troubleshooting Charging Issues with the Battery Switch
If your batteries aren’t charging as expected, the battery switch is a prime suspect. First, ensure the switch is in the correct position to allow charging to the batteries connected to your solar panel system. Next, verify all connections are secure and properly wired. Loose connections or corroded terminals can significantly impede charging. Finally, inspect the switch itself for any signs of damage or malfunction.
If you suspect a problem with the switch, consider having it tested or replaced. A faulty switch can prevent proper charging, leading to low battery voltage and potential system failures.
So, you’re planning a trip? Awesome! Don’t forget travel insurance! Check out aon travel insurance for comprehensive coverage. They’ve got options for everything from lost luggage to medical emergencies. And if you want another option to compare, aon travel insurance also offers a wide range of plans; it’s always good to shop around to find the best fit for your needs and budget before you jet off.
Happy travels!
Best Practices for Integration
To optimize your system, always use a high-quality battery switch rated for the combined amperage of your solar panels and batteries. Consider a battery switch with a “load” position, allowing you to power your trailer’s 12V accessories independently of your batteries, which reduces battery drain when not directly charging. It’s also prudent to install appropriately sized fuses and circuit breakers throughout your system to protect against overcurrent situations.
Regularly inspect your connections and switch for corrosion or damage. A proactive approach ensures a long-lasting and efficient solar power system. Finally, clearly label all wires and components for easy troubleshooting and maintenance.
Battery Switch and Inverter Operation
Your battery switch is the gatekeeper controlling power flow to your travel trailer’s appliances. Understanding its interaction with your inverter is crucial for reliable power and preventing damage to your equipment. Improper management can lead to unexpected power outages or even damage to your inverter or batteries.In essence, the battery switch determines which battery bank (or banks) provide power to the inverter.
If the switch is off, or directed to the wrong battery bank, the inverter will have no power source, even if the inverter itself is switched on. This is a common source of confusion and frustration for RVers.
Inverter Power Source Selection
The inverter draws its power directly from the battery bank selected by your battery switch. If you have a dual-battery setup and your switch is set to only one battery bank, the inverter will only use that battery bank’s power. Attempting to run high-power appliances with an insufficiently charged battery bank could lead to a low-voltage shutdown, and potentially damage to the inverter or the batteries themselves.
Always ensure the selected battery bank has sufficient charge for the intended load.
Consequences of Improper Battery Switch Management
Using an inverter without properly managing the battery switch can have several negative consequences. Firstly, you might experience unexpected power outages if the switch isn’t correctly positioned to supply power to the inverter. Secondly, running an inverter on a partially charged battery bank can lead to premature battery wear and potentially shorten their lifespan. Thirdly, overloading a single battery bank while the switch is improperly set could damage both the battery bank and the inverter due to excessive current draw and low voltage.
Finally, some inverters have safety mechanisms that will shut down if the input voltage drops too low, preventing damage but resulting in a loss of power.
Power Path from Batteries to Inverter
Imagine a simple flowchart:
1. Batteries
Your RV’s 12V battery bank (or banks).
So, you’re planning a trip? Awesome! Don’t forget travel insurance! Check out Aon travel insurance for comprehensive coverage. They’ve got options for everything from lost luggage to medical emergencies. Seriously, it’s a lifesaver. And if you want another option to compare, look at Aon travel insurance – they might have a plan that better suits your needs and budget.
Getting insured is a small price to pay for peace of mind while you’re exploring the world!
2. Battery Switch
This acts as a selector switch, choosing which battery bank(s) provide power. It’s usually a multi-position switch allowing selection of “off,” “battery 1,” “battery 2,” or “both.”
3. Inverter Input
The power from the selected battery bank flows to the inverter’s input terminals.
4. Inverter
The inverter converts the 12V DC power from the batteries into 120V AC power.
5. AC Outlets
The 120V AC power is then available at your RV’s AC outlets.
Power flows only when the battery switch is in the correct position to connect the selected battery bank to the inverter’s input. Incorrect settings mean no power to the inverter, regardless of the inverter’s “on” status.
Safety Considerations When Using the Battery Switch
Working with a battery switch in your travel trailer involves electricity, which can be dangerous if not handled correctly. Improper use can lead to serious injury or damage to your equipment. Understanding and following safety procedures is crucial to prevent accidents.This section details the potential hazards associated with incorrect battery switch operation and provides clear instructions for safe handling to prevent electrical shocks or fires.
We’ll also look at a real-world example to illustrate the consequences of neglecting safety precautions.
Electrical Shock Hazards
Direct contact with battery terminals or exposed wiring while the battery switch is on can result in a severe electrical shock. The voltage in your travel trailer’s battery system is sufficient to cause serious injury or even death. Always ensure the battery switch is in the “OFF” position before performing any maintenance or repairs near the battery or wiring.
Wear insulated gloves and use insulated tools to further minimize risk. Never work on the electrical system while wet or in damp conditions.
Fire Hazards
Sparks from loose connections or accidental short circuits near the battery switch can easily ignite flammable materials. Travel trailers often contain many such materials, such as upholstery, bedding, and propane tanks. Regularly inspect the battery connections for corrosion and tightness. Keep the area around the battery switch clean and free of debris. Ensure proper ventilation to prevent the buildup of flammable gases.
Never use a battery switch that is damaged or shows signs of overheating.
Scenario: Improper Battery Switch Use Leading to Problems
Imagine a scenario where a camper, eager to start their generator, flips the battery switch to the “ON” position without first checking the connections. A corroded terminal creates a weak connection, generating significant heat. This heat ignites nearby flammable materials, such as cleaning rags left near the battery. The ensuing fire quickly spreads, causing extensive damage to the trailer and potentially putting the occupants at risk.
This highlights the importance of careful inspection and proper procedures before using the battery switch. A simple visual inspection and a few moments spent ensuring clean, tight connections could prevent a disastrous outcome.
Mastering your travel trailer’s battery switch is essential for a smooth and safe RV experience. From understanding the different switch types to troubleshooting issues and integrating additional power sources, this guide equips you with the knowledge to confidently manage your trailer’s electrical system. Remember to always prioritize safety when working with batteries and electricity. Happy travels!
FAQ Summary
What happens if my battery switch is corroded?
Corrosion can prevent proper electrical contact, leading to poor battery performance or even a complete power failure. Clean the terminals with a wire brush and baking soda solution.
Can I use a different type of battery switch than what came with my trailer?
Yes, but ensure the new switch has the correct amperage rating and pole configuration for your system. Improper replacement could damage your electrical system.
How often should I check my battery switch?
Regularly inspect for corrosion, loose connections, and damage. A yearly check is recommended, more frequently if you use your trailer extensively.
Why is my battery switch getting hot?
Excessive heat indicates a high electrical load or a loose connection. Turn off the switch immediately and investigate the cause. A faulty switch may need replacement.
